AI-Driven Data Unification: Weather and Tracking Data in BigQuery
Learn how to establish a production-ready pipeline to ingest diverse data sources into BigQuery.
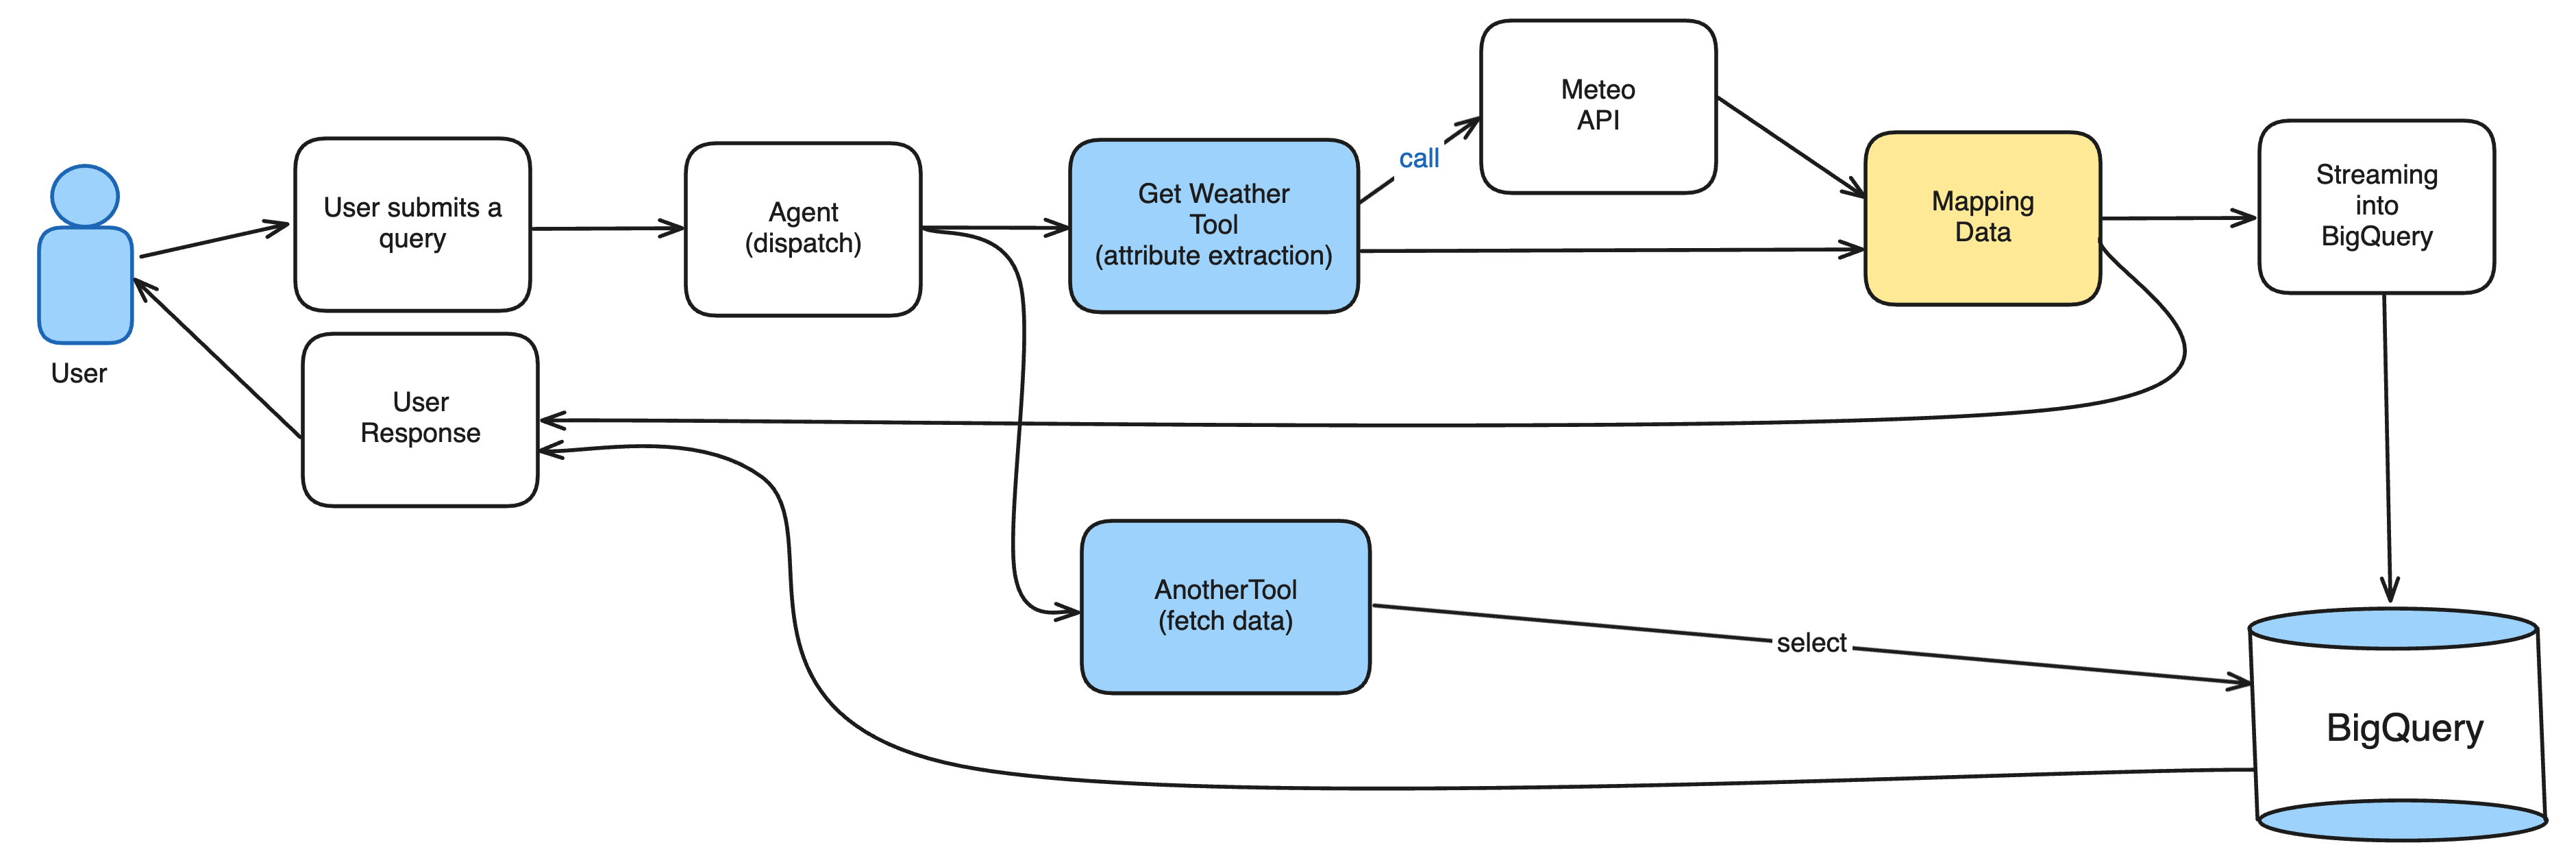
We will demonstrate this using a Function Calling architecture where:
- A user's natural language query is processed by an AI Agent.
- The AI standardizes the location details (country, city, lat/lon) necessary to call a weather API.
- The resulting structured data (weather metrics and original location) is streamed and persisted in BigQuery for tracking and analysis.
Data source and Base model:
We are implementing a simple AI Function Calling pipeline:
- The user initiates a query (e.g., asking for weather).
- The AI Model determines intent, calls the internal weather tool, and provides structured geographic parameters (lat/lon).
- The backend calls the Open-Meteo API to fetch the relevant temperature and wind speed.
- The output is serialized and streamed to BigQuery for permanent tracking and analysis.
- The system sends the final result back to the user.
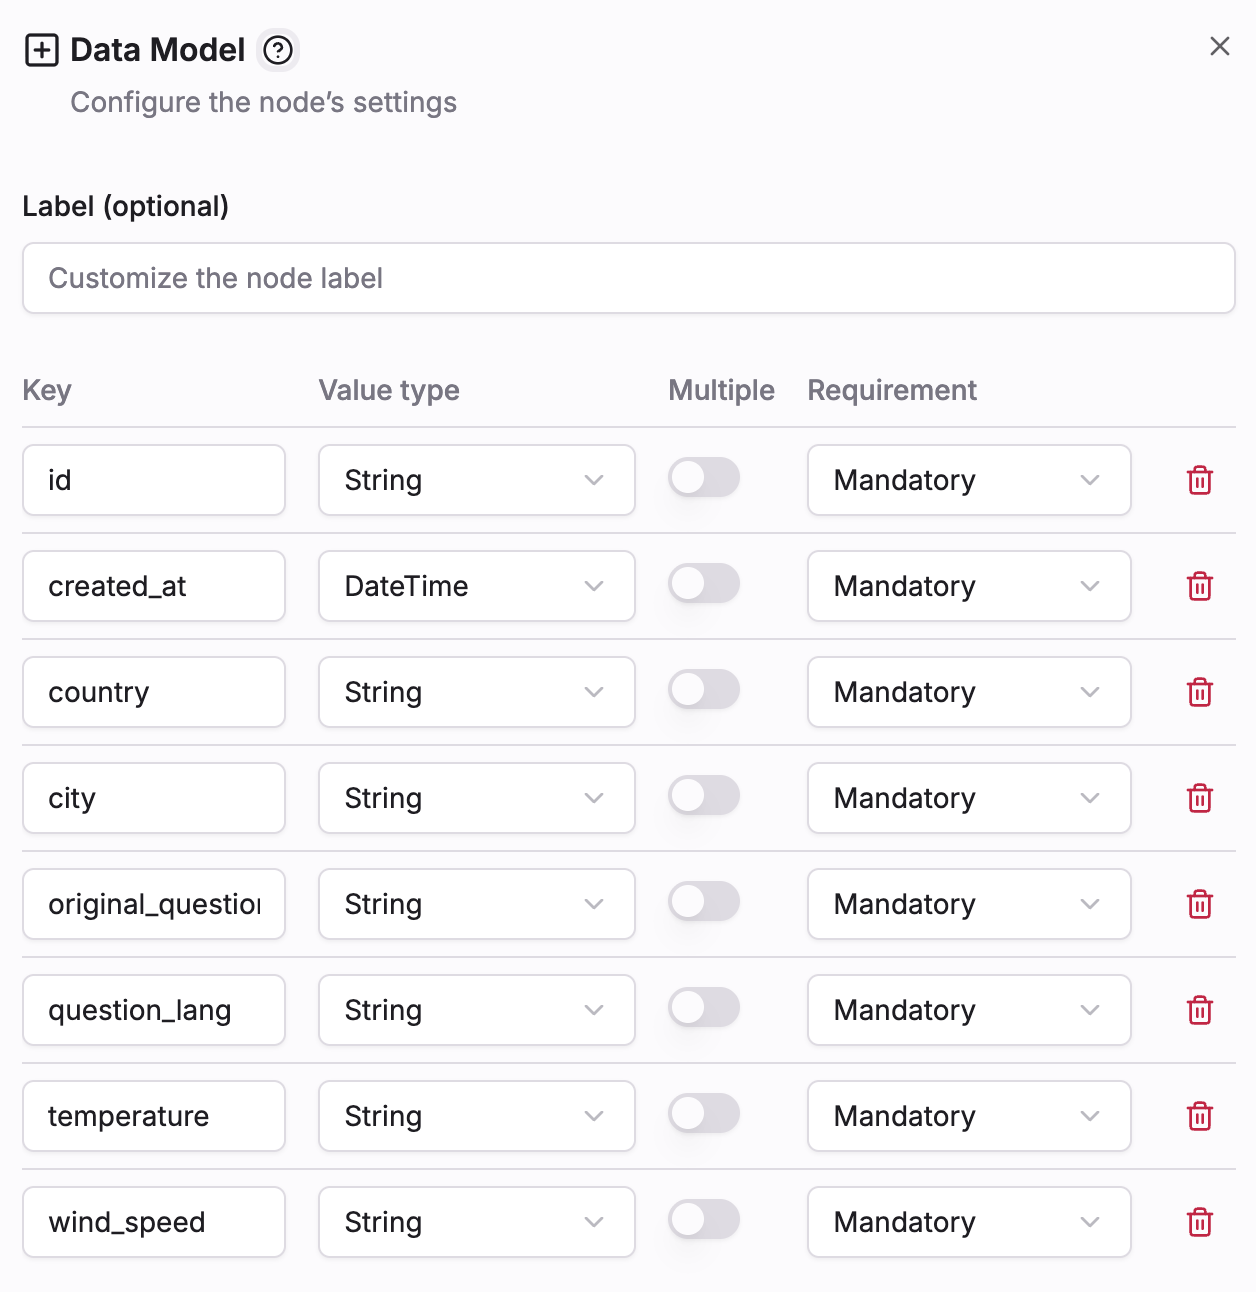
Step 1: Big Query table setup
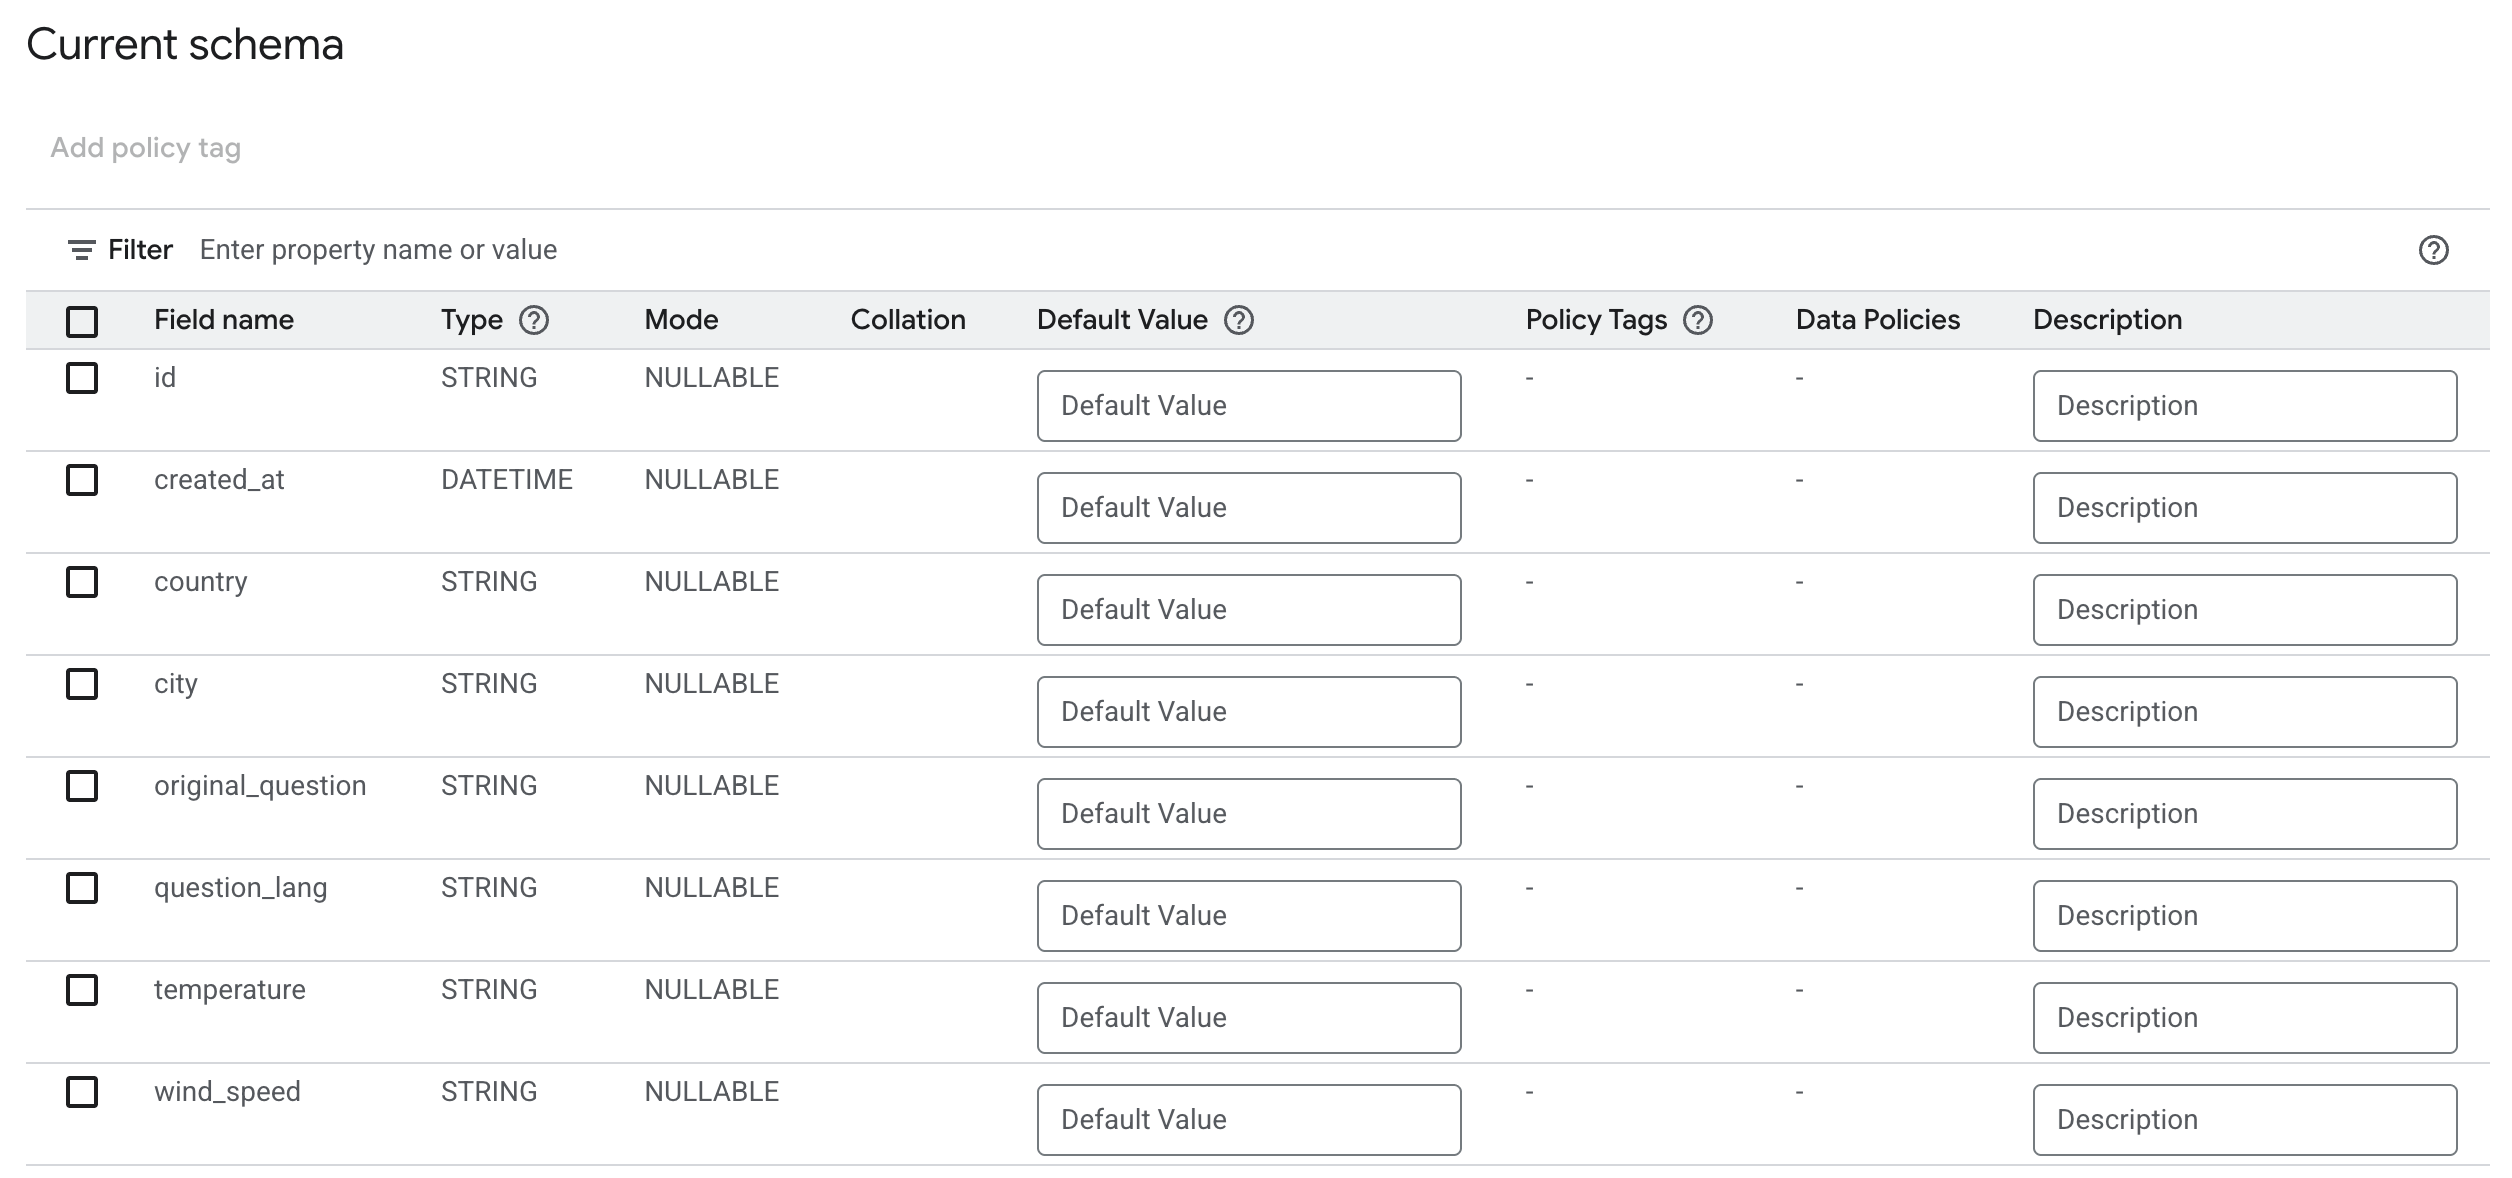
We will capture attributes using the following schema model:
{
  "id": "d1a9b60d-3cee-4be7-b9fa-be7814f41eb3",
  "created_at": "2025-10-22T12:07:54",
  "country": "GB",
  "city": "LONDON",
  "original_question": "what is the weather in london?",
  "question_lang": "EN",
  "temperature": "13.6°C",
  "wind_speed": "5.0km/h"
}
In the BigQuery Studio within your Google Cloud account, create a new table named capture_get_weather_queries. Ensure all fields from the provided JSON model are included in the table schema.
Your schema should look like this:
Step 2: Zparse Workflow
In Zparse create a new Workflow: AI Weather
2.1 Endpoint
To set up your data intake, follow these steps:
- Add a
Web server > JSON endpoint. This creates an accessible API where you can send data using the JSON format. - Extract the Query: Link a function (
JSON > Extract from JSON) to parse the incoming request and safely retrieve the user's query as a simple text string.
Your resulting API signature will successfully process requests formatted like this:
{
  "query": "What's the weather like in Bordeaux?"
}
2.2 AI Agent
a) Virtual Agent Setup
Now, let's integrate the intelligence layer by adding the AI > Virtual Agent node. In Zparse, this Agent serves as the bridge that connects the AI provider (here, Mistral) to the specific tools you want it to execute.
Agent Description (Context is Key!)
Under the Agent's configuration, define its purpose using the description field. While a simple description works for basic tasks, a more detailed prompt significantly improves the AI's reliability in complex scenarios.
For now, you can use the concise description:
"Use the best tool at disposal to answer the user query."
Crucial Context: The Agent's description provides the core context for the AI model's reasoning. For complex use cases, taking the time to write a detailed, well-defined context is essential for high accuracy and effective tool calling.
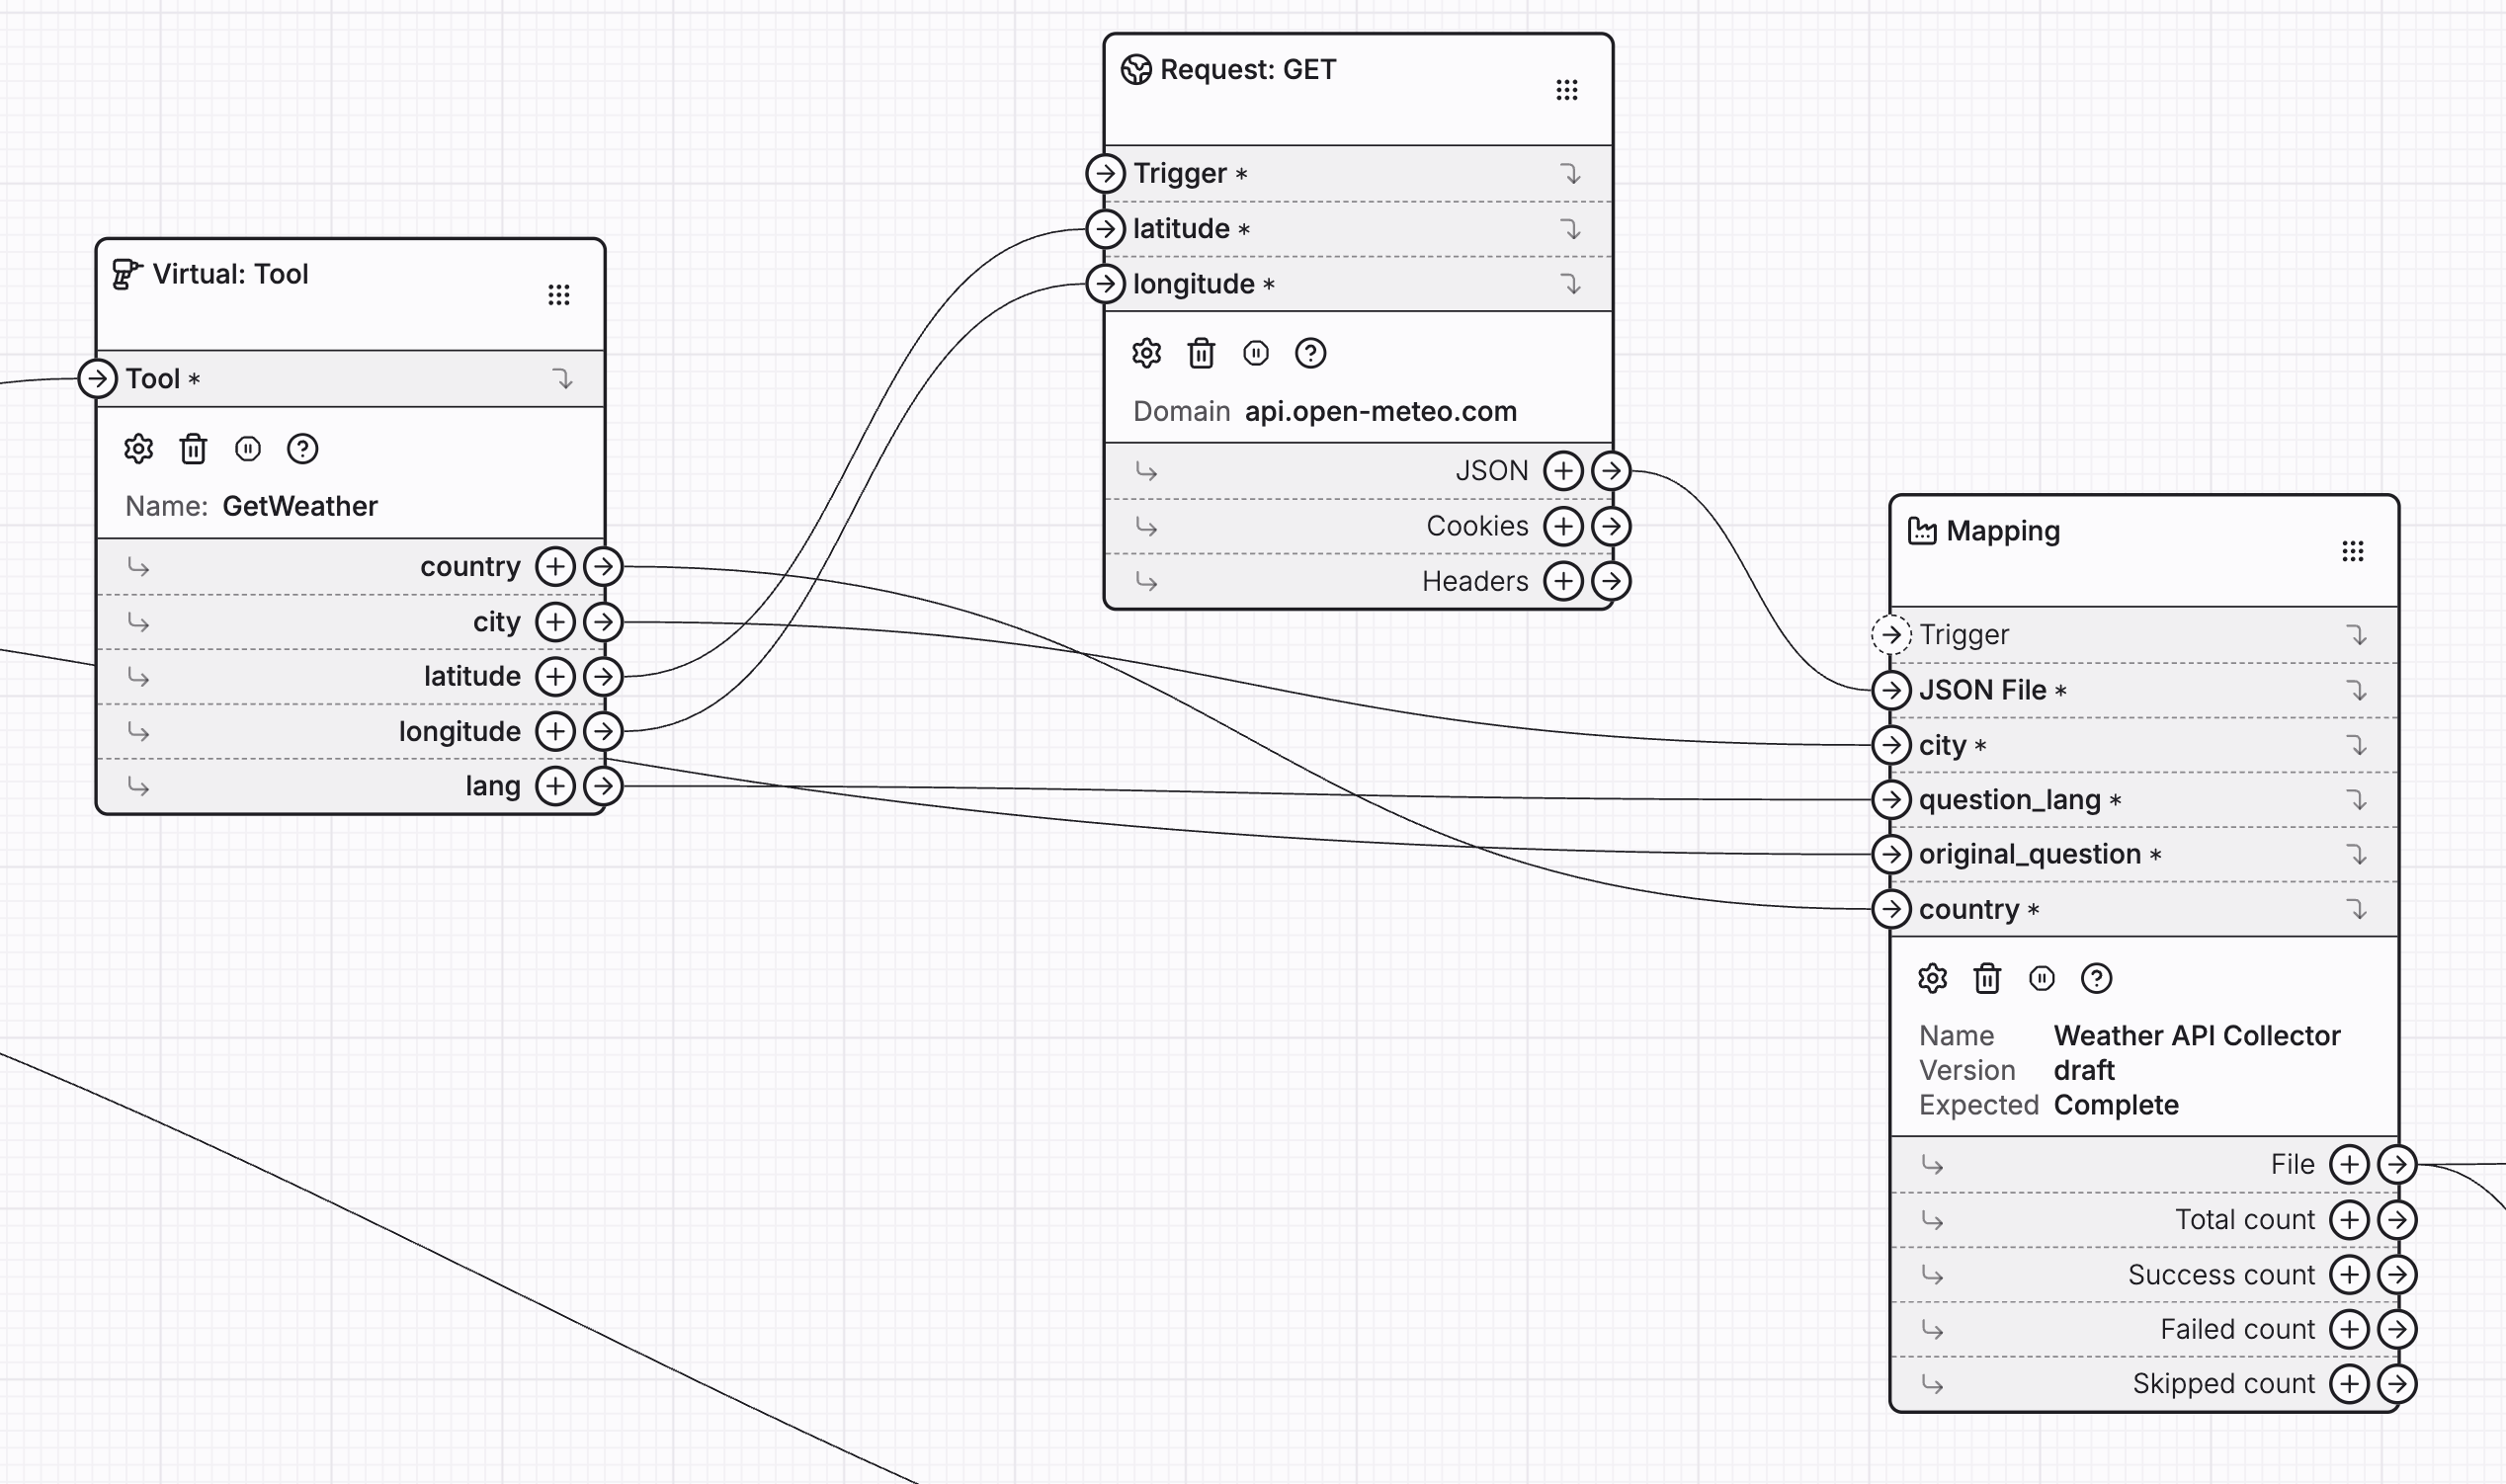
b) Tool Setup: Geographic Data Extractor
Next, let's define the first external function the AI Agent can call by adding the AI > Virtual Tool node.
This initial tool GetWeather will be responsible for processing the user's natural language query and extracting the necessary geographic parameters to make the external weather API call.
Tool Configuration
Under the tool's settings, you must define the output schema—the exact information the AI must retrieve from the user's text before proceeding.
Add four required properties to the tool's schema, corresponding to the parameters you need for data retrieval:
- country (String): country matching current requested city in ISO format in uppercase
- city (String): city detected in the query in uppercase
- latitude (String): latitude of the city
- longitude (String): longitude of the city
- lang (String): language of the original question in ISO code format
By marking these fields as required, you instruct the AI (Mistral) that it must successfully extract all four pieces of information from the user's question before it can complete the tool call and send the data to the next step.
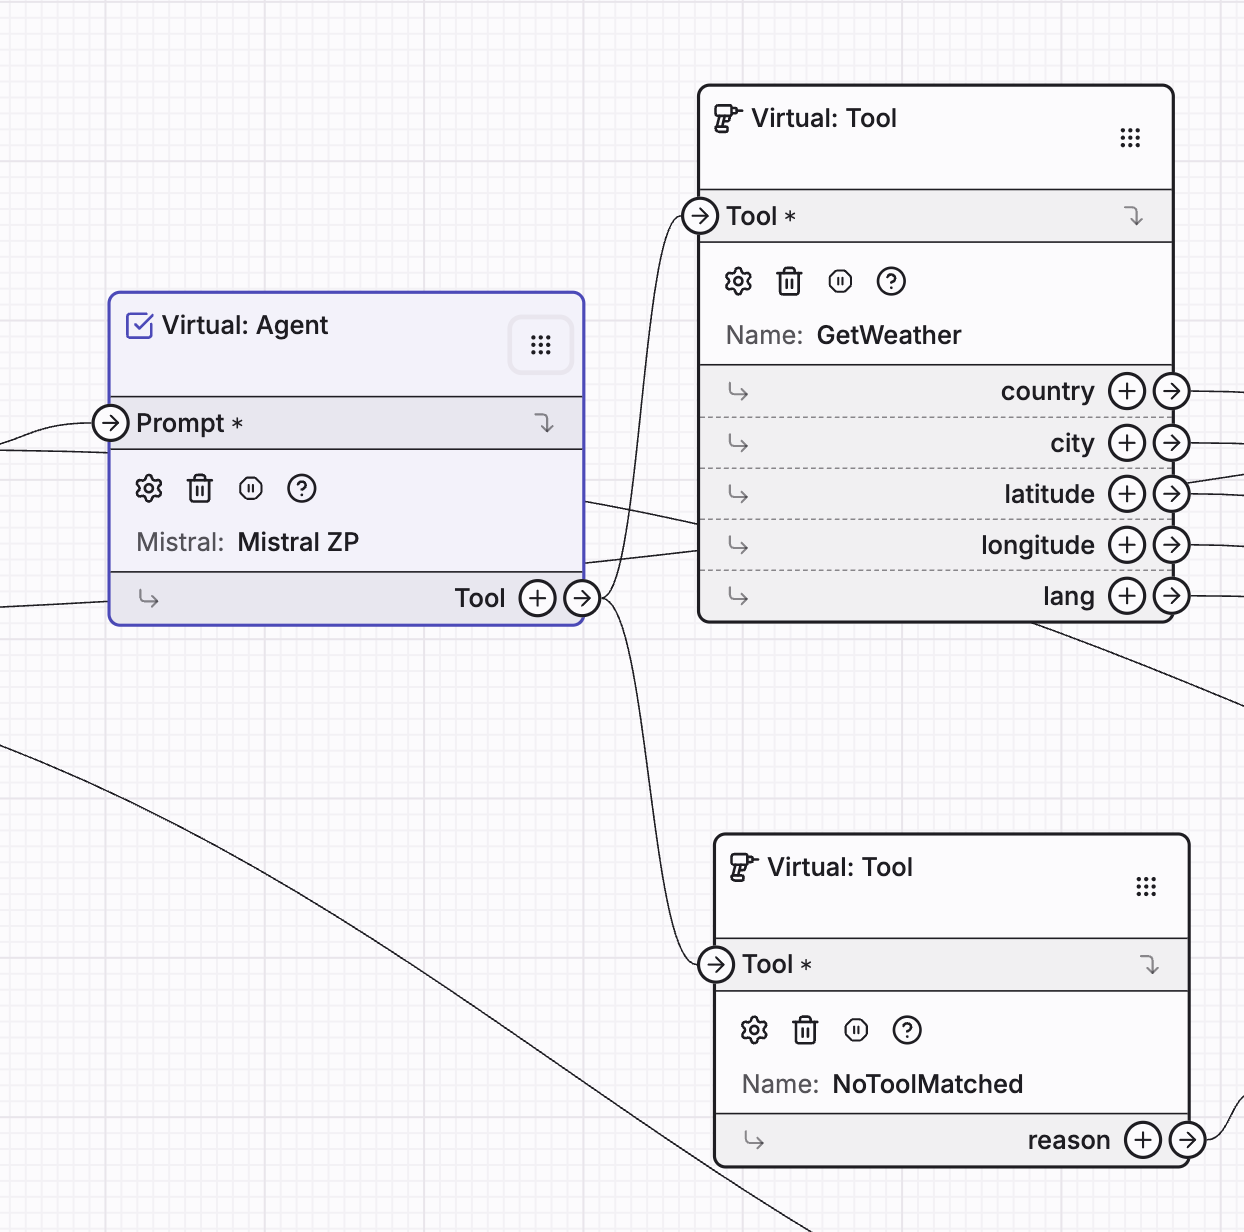
c) Fallback tool
To handle scenarios where the AI fails to find a suitable function, implement a fallback tool.
Add a new AI > Virtual Tool named NoToolMatched. This tool should include one required parameter:
- reason (string): Use this to capture and return the AI's explanation for why it couldn't utilize any of the available tools. This is crucial for debugging and understanding the agent's limitations.
2.3 Query open-meteo
Next, we will use the Web Request > Request GET function to fetch the required weather data.
This function will make a call to the Open-Meteo API (https://api.open-meteo.com) to retrieve the wind speed and temperature, utilizing the geographic parameters (latitude/longitude) extracted by the AI in the previous step.
URL: https://api.open-meteo.com
Query parameters:
current-->temperature_2m,wind_speed_10m(not dynamic)latitude--> dynamiclongitude--> dynamic
Response type: Json
Example response from open-meteo API:
{
  "current": {
    "interval": 900,
    "temperature_2m": 14.1,
    "time": "2025-10-23T09:00",
    "wind_speed_10m": 12.6
  },
  "current_units": {
    "interval": "seconds",
    "temperature_2m": "°C",
    "time": "iso8601",
    "wind_speed_10m": "km/h"
  },
  "elevation": 37,
  "generationtime_ms": 198.6376047134399,
  "latitude": 52.52,
  "longitude": 13.4,
  "timezone": "GMT",
  "timezone_abbreviation": "GMT",
  "utc_offset_seconds": 0
}
2.4 Mapping: Meteo Response to BigQuery Schema
Now that we have successfully retrieved the raw weather data from Open-Meteo, the next critical step is to process and transform this response into the exact schema required for our BigQuery table (capture_get_weather_queries).
Create a new data mapping named Weather API Collector.
Source: JSON Elements with path $
Extraction: add JSON > Extract values from path with both current and current_units extracted as JSON.
Add another extraction layer from those to get temperature_2m and wind_speed_10m.
Next: Add 2 Text > Template to generate our 13.5°C from 13.5 and °C
id: Add a Text > Random UUID to generate our unique identifier
created_at: Add a Module > DateTime now in UTC + format %Y-%m-%dT%H:%M:%S (accepted by DATETIME format from BigQuery)
# Injected parameters: Add 4 Module > Injected value
- country (String): to inject detected country from the AI tool
- city (String): to inject detected city from the AI tool
- original_question (String): to inject original question from the user
- question_lang (String): to inject detected lang from the AI tool
# Destination: JSONL Writer with a Data Model containing all fields matching our BigQuery data model properly linked.
View of the Mapping once completed
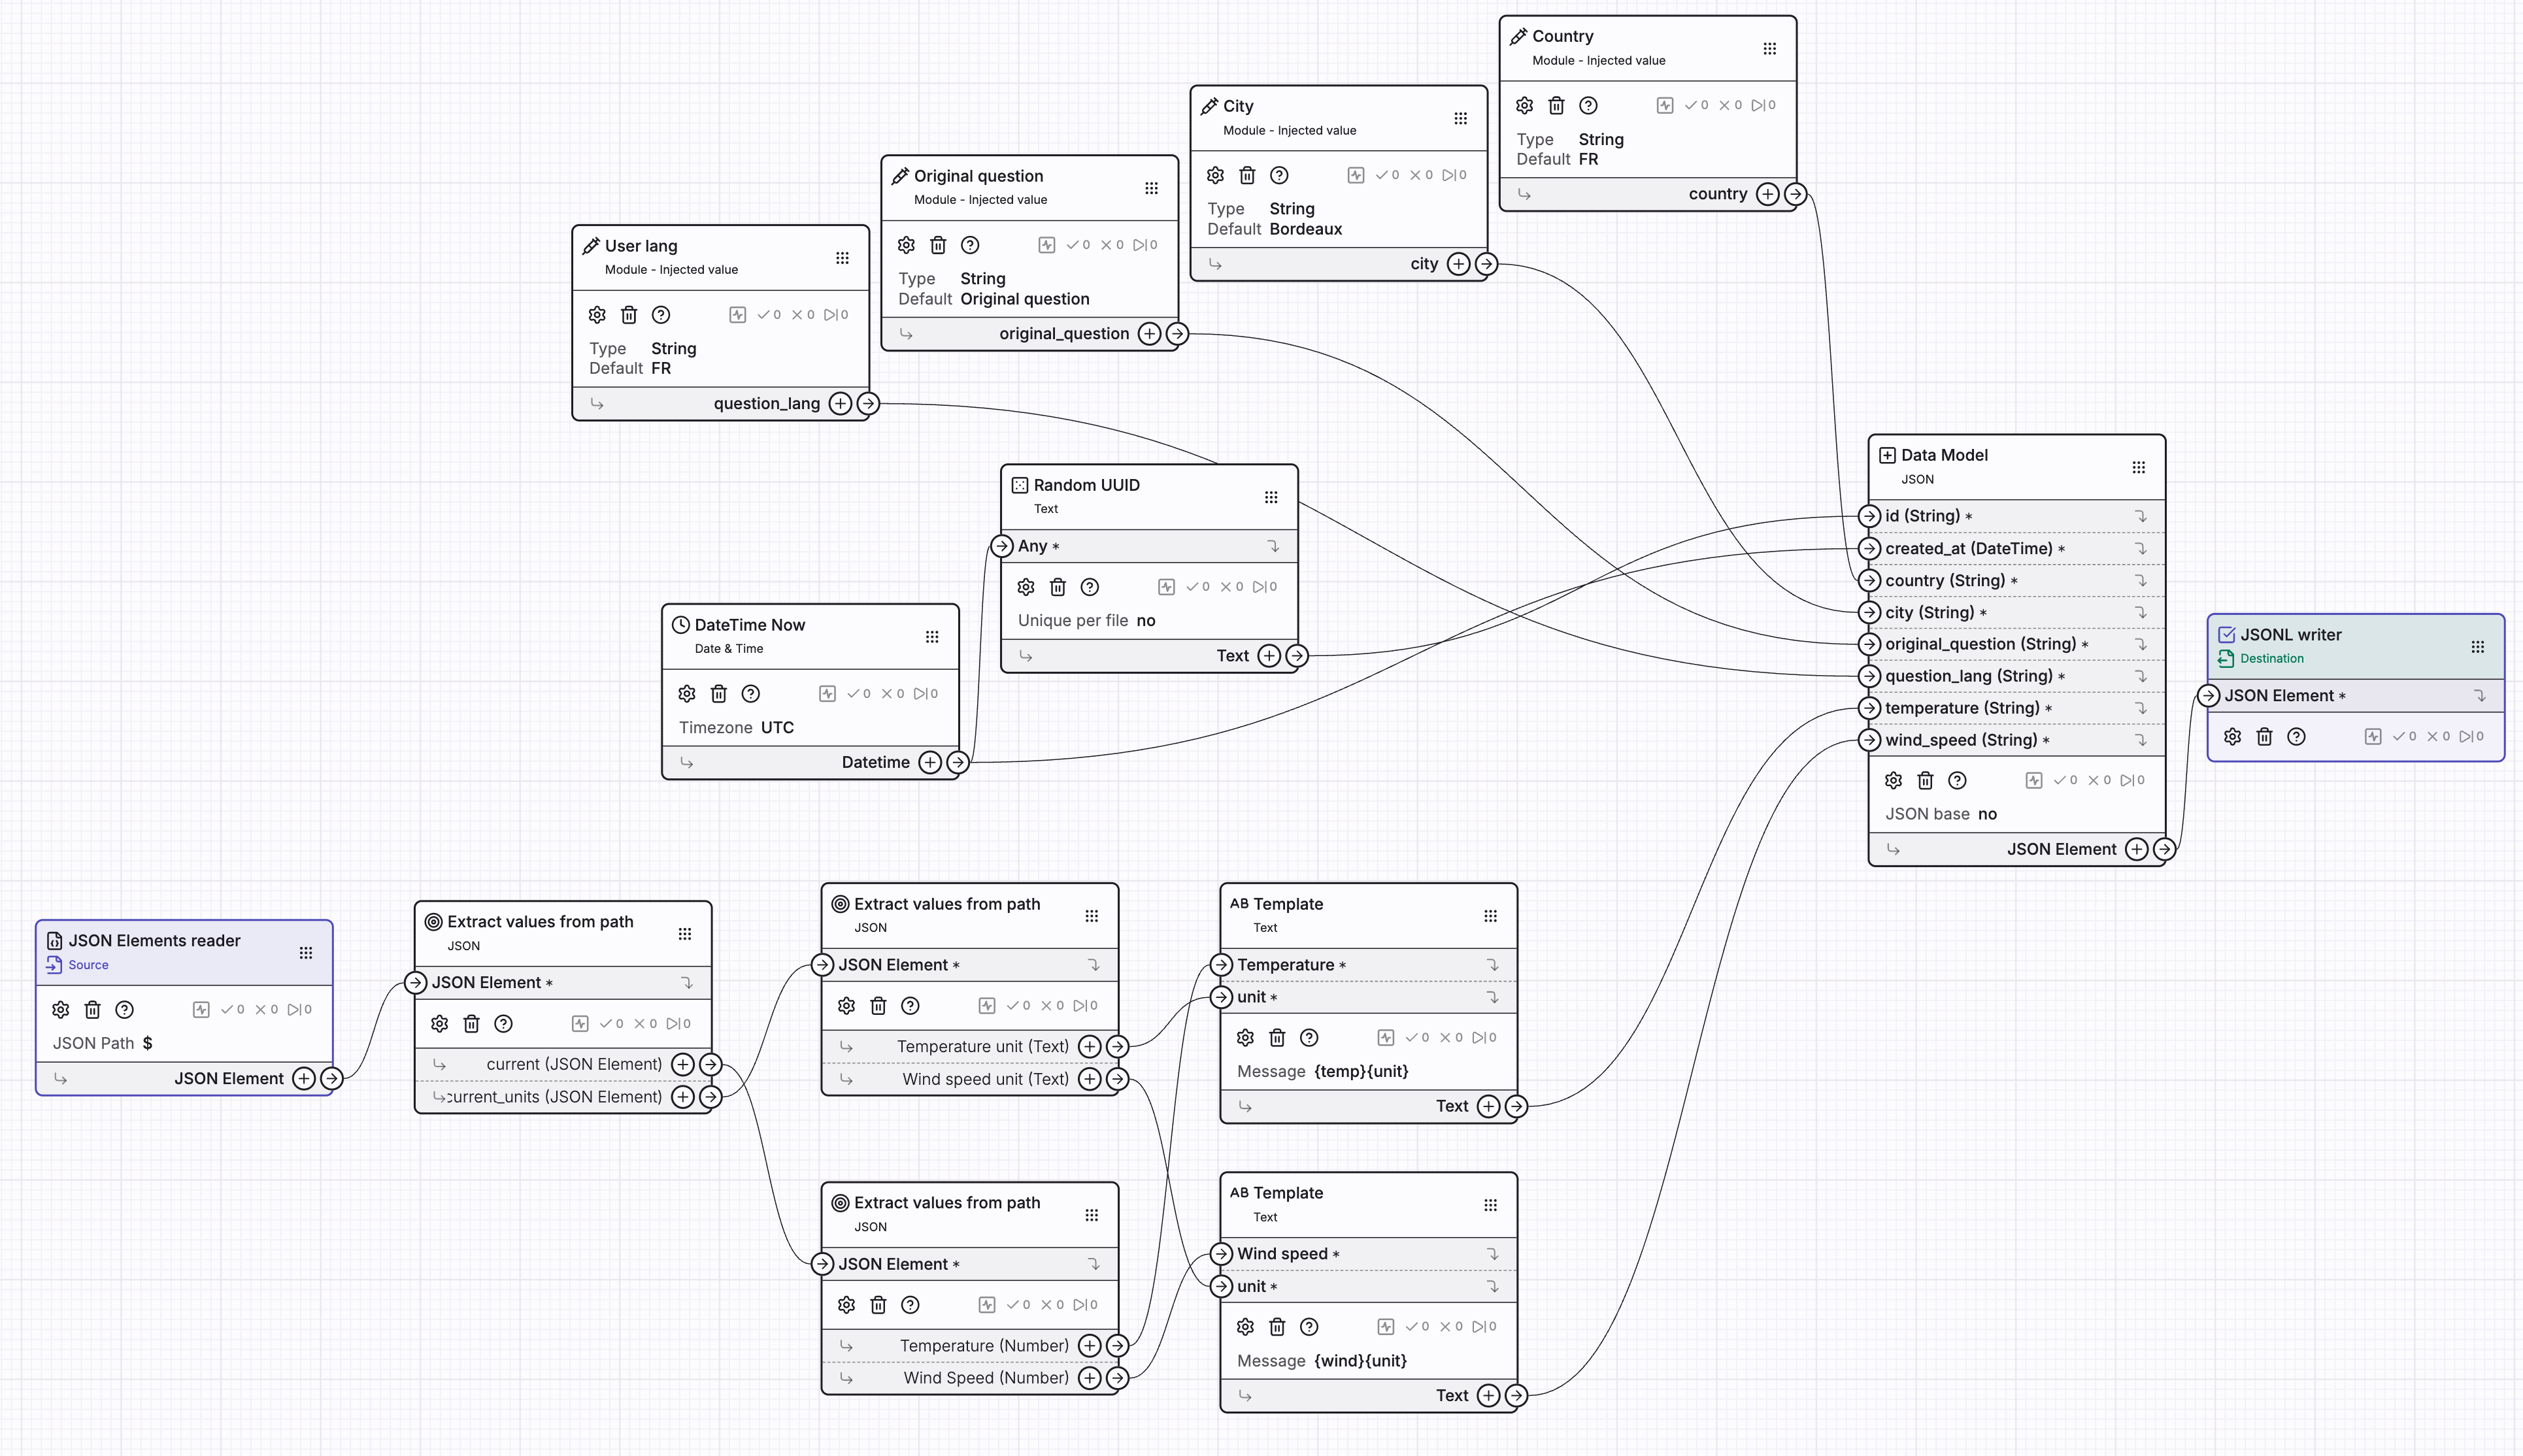
With the mapping defined, let's finalize the pipeline connections in the workflow:
Route the API response directly into the input of the Weather API Collector. Simultaneously, ensure all injected parameters (such as city, country, and the original query) are correctly linked to the mapping's corresponding input slots.
2.5 Store data into BigQuery
To persist the final, formatted data, introduce the Google > BigQuery node.
After configuring your Google Cloud application (including the required Project ID and Dataset ID):
- Set the operation endpoint to Streaming Insert.
- Specify the destination table as capture_get_weather_queries.
Now, connect the structured output from your data mapping directly into the BigQuery node to complete the ingestion pipeline.
2.6 Return response
To close the loop and send the final data back to the user's browser, add a Web server > File Response node. Connect the structured output from your Mapping into this final node.
✅ Workflow Complete! You have successfully built an AI-powered data ingestion and retrieval API.
Step 3: First run !
Now that the setup is complete, you can test your pipeline.
Navigate to the upper-left corner of the workflow interface and click Run. Enter your first query in the input field that appears:
{
  "query": "what is the weather in Bordeaux?"
}
As confirmed by the execution logs, the AI successfully routed the query to our designated tool:
Feel free to experiment with the workflow! Try different questions, languages, and locations to fully test the Agent's routing and extraction capabilities.
Step 4: Validate data reception in BigQuery
Confirm Data Insertion in BigQuery:
Execute a SELECT query in BigQuery to verify that the data has been inserted correctly into the table.
SELECT * FROM `{PROJECT_ID}.{DATASET_ID}.capture_get_weather_queries` ORDER BY created_at DESC LIMIT 1000

Based on the current results, we should refine the weather tool's output schema to ensure the city name is returned in plain English (or a standardized format).
Step 5: Adding another tool
Now, let's add a second tool to enable the Agent to retrieve historical user data. This new tool will allow us to query the last 10 queries made by users for a specific country from BigQuery.
1. Configure the Virtual Tool
- Add a new
AI > Virtual ToolnamedLastQueriesByCountry. - Description: Set this to
"Get the last 10 queries made by users for a specific country." - Parameter: Add one required parameter:
- Name:
country(String) - Description:
"The ISO 3166-1 alpha-2 code of the country (e.g., 'FR', 'US') to retrieve the last 10 user queries from."(Using a standard like ISO code improves AI accuracy).
- Name:
2. Connect to the Agent
- Link the
LastQueriesByCountrytool to theAI > Virtual Agentnode defined in the previous steps.
3. Set Up the BigQuery Query Module
- Add a
Google > BigQuerynode. - Endpoint: Set the endpoint to
Query Select. - Query to get last request by country
SELECT *
  FROM `{PROJECT_ID}.{DATASET_ID}.capture_get_weather_queries`
  WHERE country = @country
  ORDER BY created_at DESC
  LIMIT 10
- Query Parameter: Define one required input parameter on the BigQuery node:
- Parameter Name:
country(This will receive the value extracted by the AI tool). - Named Parameter in SQL: Use
@countryin your actual SQL query to filter the results (e.g.,WHERE country = @country).
- Parameter Name:
4. Complete the Flow
- Add a
Web server > File Responsenode to return the data to the user. - Connect the output of the BigQuery node (the query results) directly to the input of the
File Responsenode.
✅ Setup complete! The Agent can now intelligently decide between fetching weather and retrieving historical query data.

Now execute your workflow with a query like:
{ "query": "last queries for japan" }
you should get a response like:
{"city":"KYOTO","country":"JP","created_at":"2025-10-23T12:10:12","id":"32b13273-c4a2-47db-8f43-41e67f5aacbb","original_question":"京都の気温はどれくらいですか?","question_lang":"JA","temperature":"15.2°C","wind_speed":"3.6km/h"}
{"city":"TOKYO","country":"JP","created_at":"2025-10-23T12:09:54","id":"d96fd8c8-4940-48b7-b051-6c167958060b","original_question":"東京の気温は何度ですか?","question_lang":"JA","temperature":"13.7°C","wind_speed":"4.2km/h"}
{"city":"TOKYO","country":"JP","created_at":"2025-10-23T12:09:27","id":"854c6278-4c04-408a-89d0-3838d5034347","original_question":"東京の気温は何度ですか?","question_lang":"JA","temperature":"13.7°C","wind_speed":"4.2km/h"}
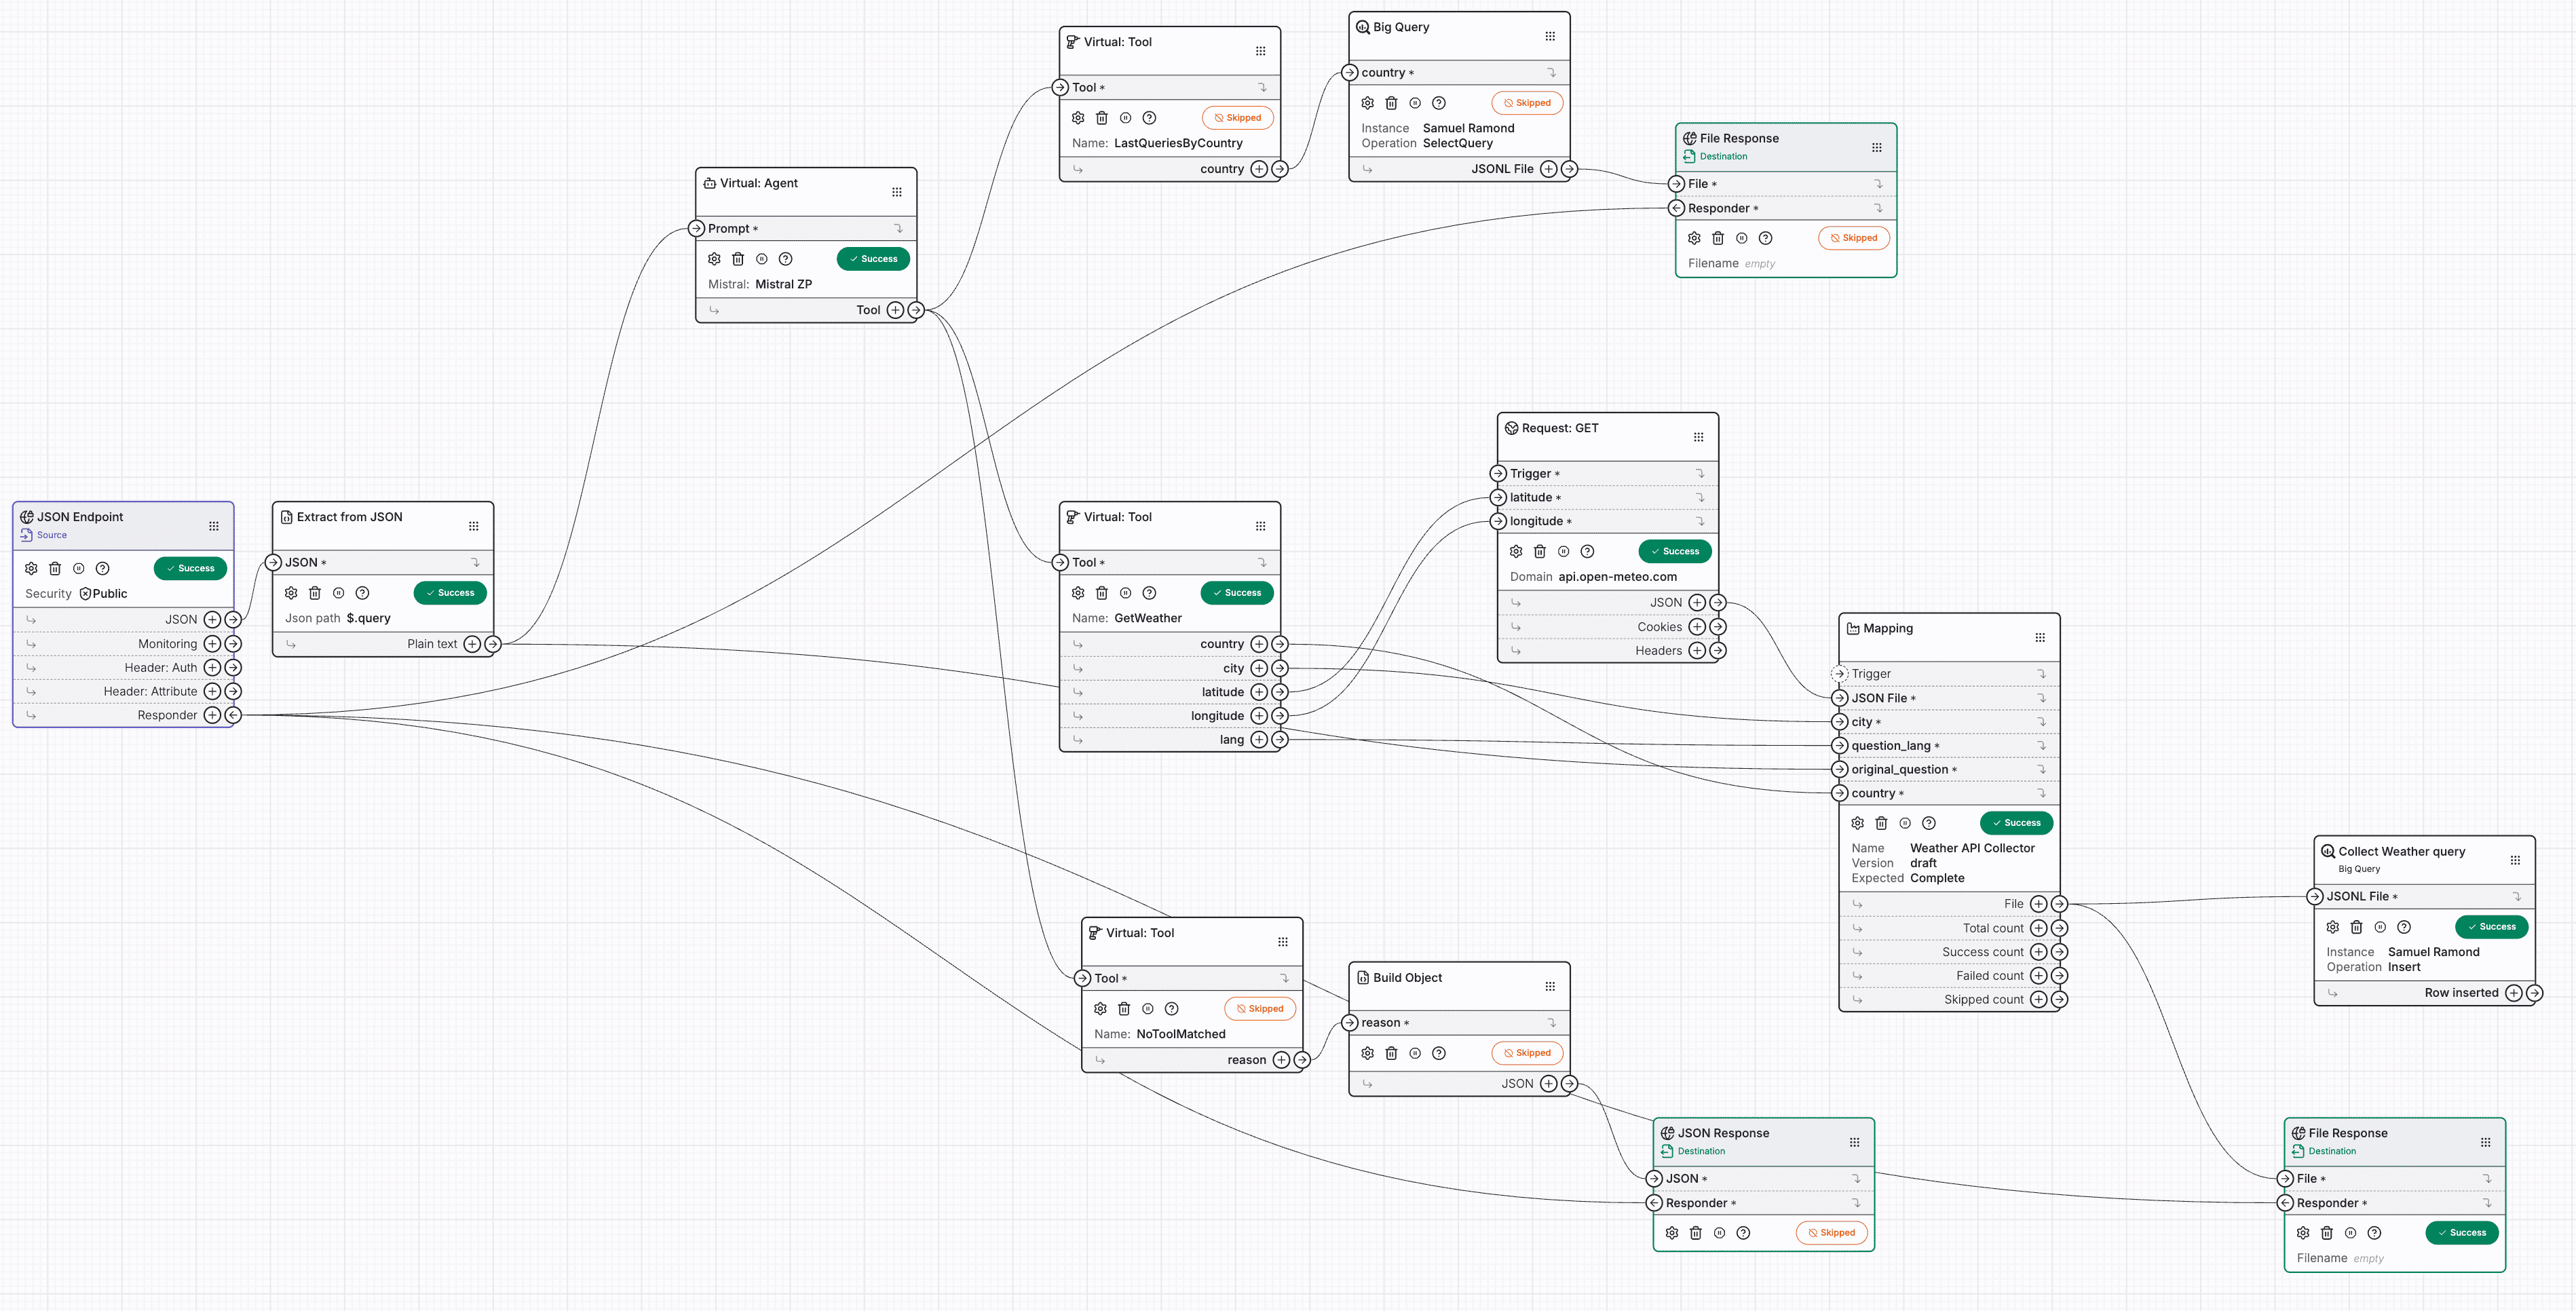
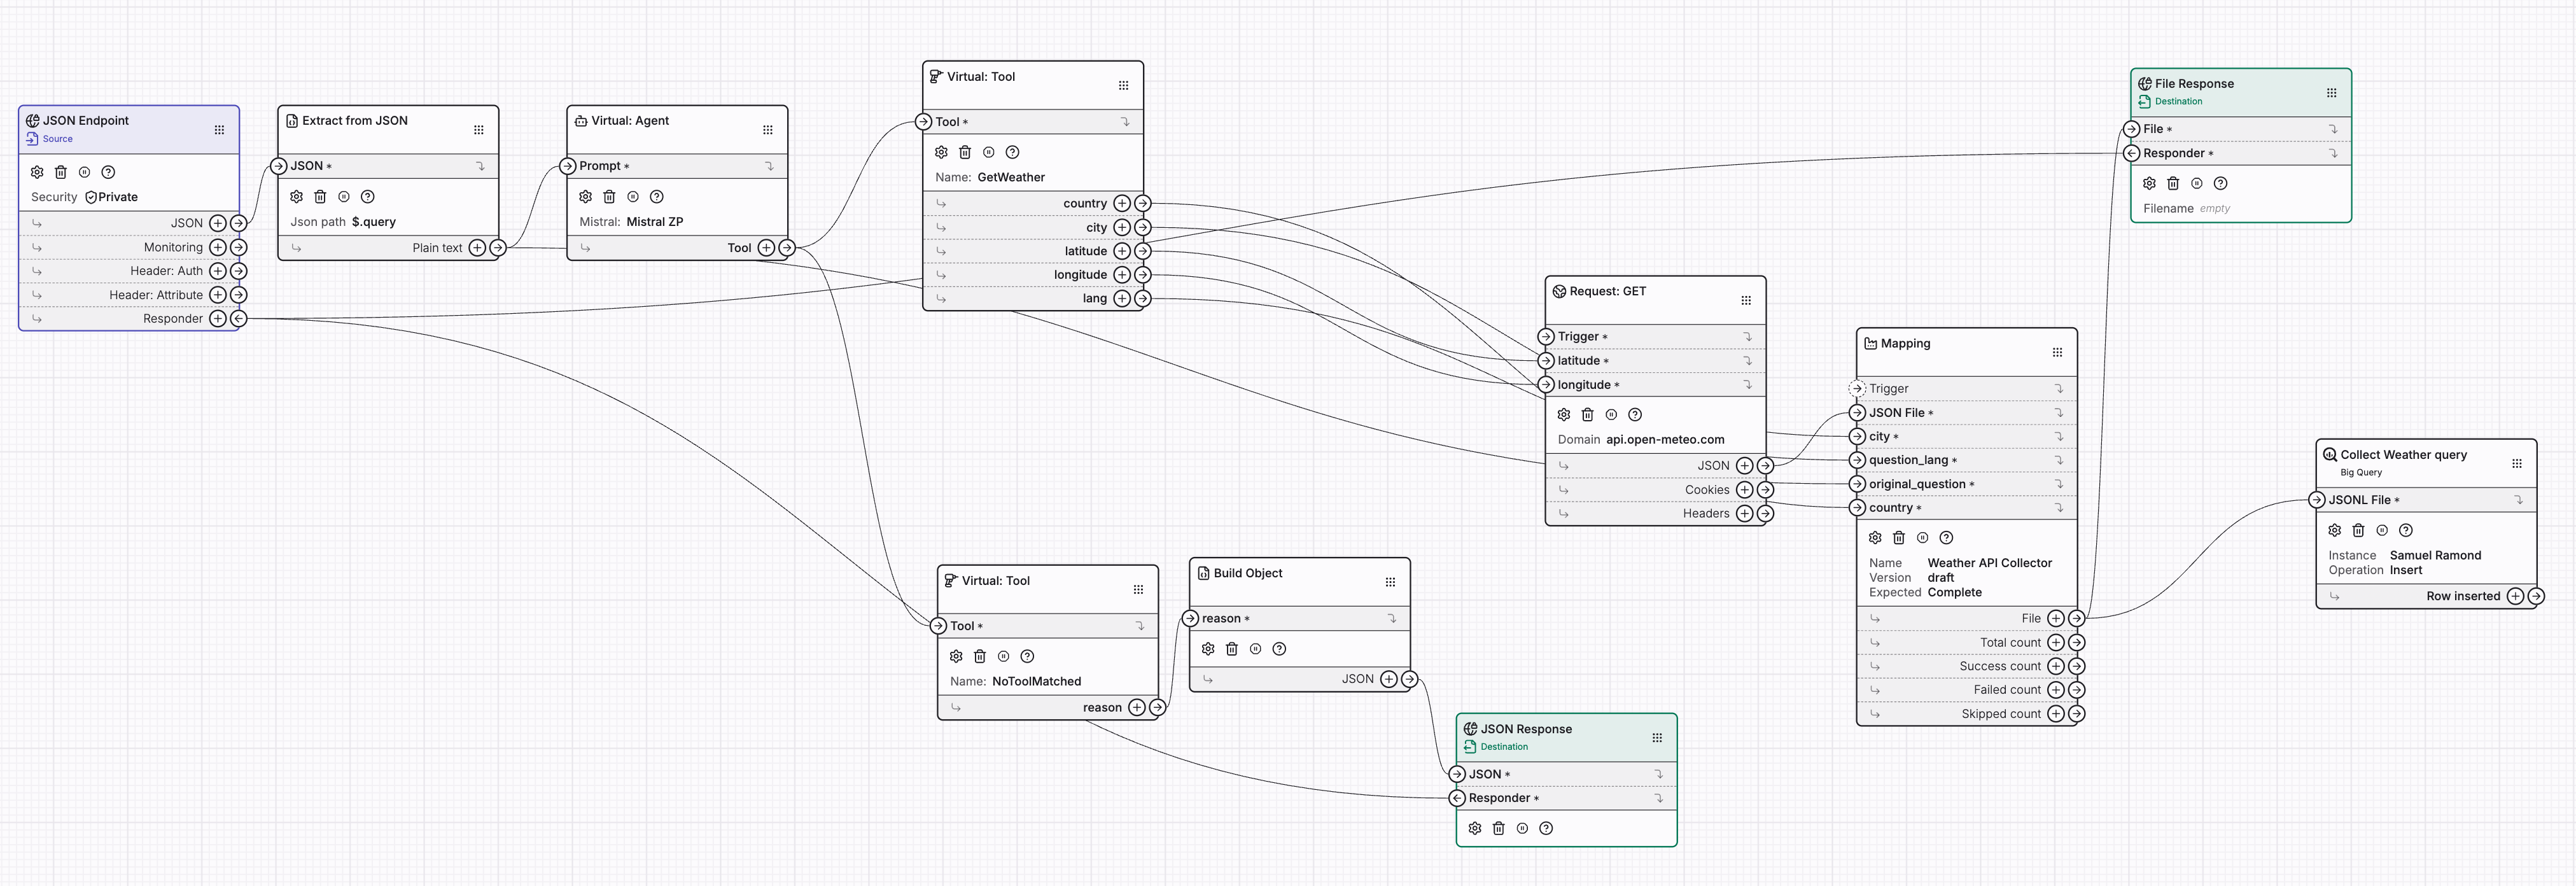
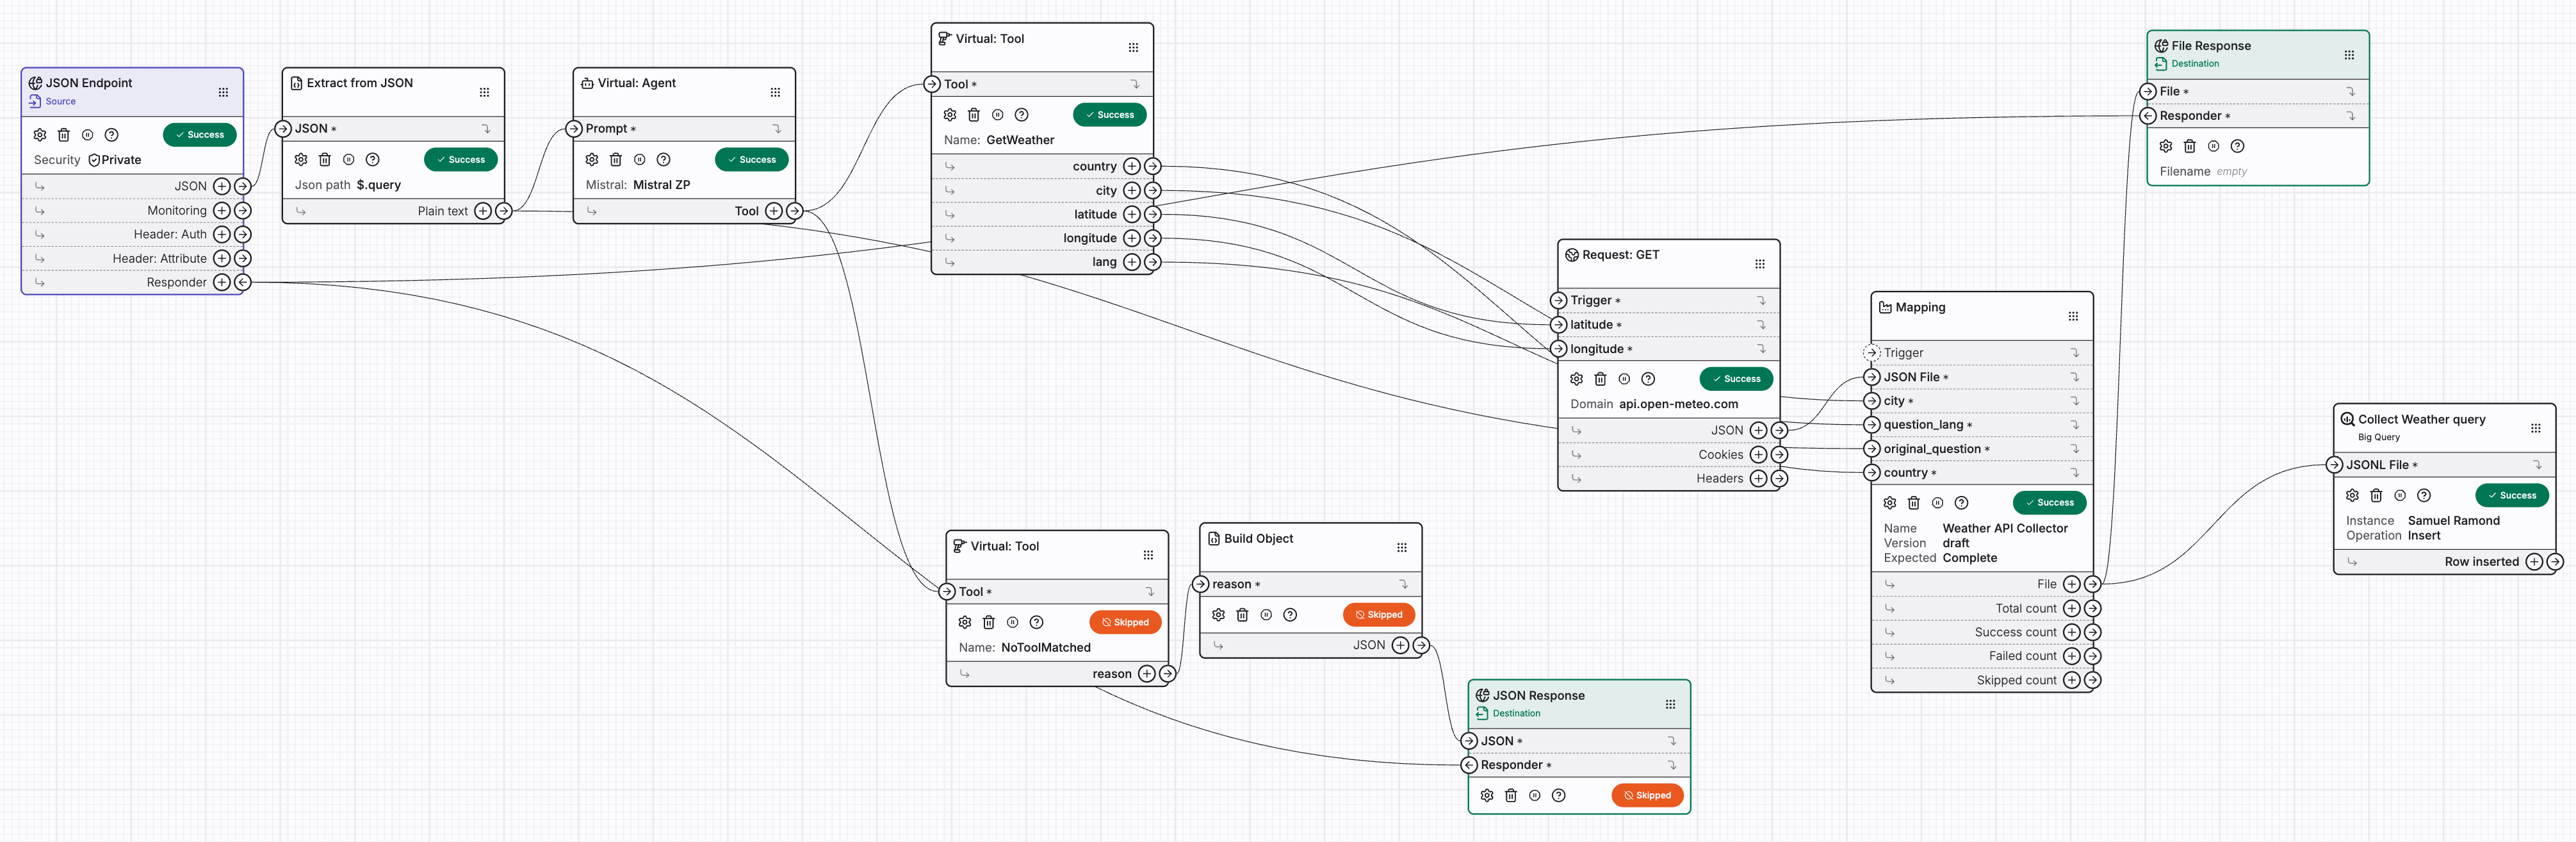
Overview: Final workflow
The image below illustrates the complete, end-to-end workflow: